
Download Zenix3D – Windows 7 & 10
Watch video
Learn how to play
Create your own levels
Download the music
Download the art work
Zenix3D Strategy
When I first released Zenix3D to my friends, everyone complained that it was too hard. Well, it’s an arcade shooter and it’s supposed to be hard. The key to doing well is to play the practice levels and know the strategy to win. Rest assured, if you can beat Zenix3D, you’re in the top 1%.
If you really want easy, you can make your own easy games.
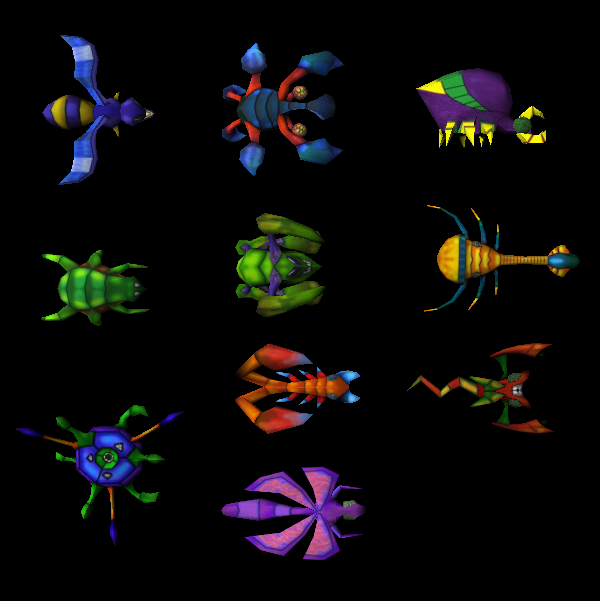
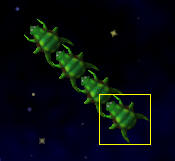
Enemy Fuel Bugs
|
|
Shoot them once and something good falls out of them.
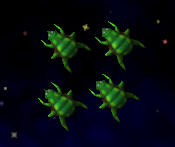
Friendly Fuel Bugs (+5 shield)
|
|
Shoot an enemy fuel bug once, and a friendly fuel bug falls out. Hit one of these with your ship and collect bonus shield and power up.
White: Bonus shield +5
Yellow: Bonus shield +5, and three bullets for 10 seconds
Red: Bonus shield +5, and armored bullets for 10 seconds
Armored bullets are red and go through the enemy to hit the enemy behind. With these, you can take out a line of bullets and hit more than one enemy at a time when they are lined up.
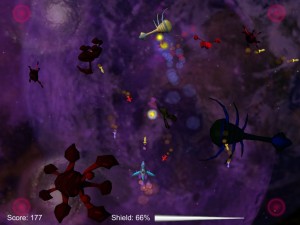
Enemy Bullets
Getting hit by an enemy bullet: Shield -4
Blue Bullet: Falls straight down. Armor piercing bullets are the most effective against blue bullets since you can eliminate an entire row of them with a single shot.
Yellow Bullet: Lobbed in a straight line towards you. There are two very effective ways to dodge these bullets. The first method is to move slowly across the screen at a constant velocity. None of the yellow bullets will hit you. The second method is to stay in the same position until several bullets are about to hit you and then move quickly to a new position near by. But watch out! Moving quickly back and forth across the entire screen will cause them to spread out in all directions and will make it nearly impossible to dodge them. Watch my technique in Galactic Graveyard: [Coming soon].
Red Bullet: Moves towards you, but always in a downward direction.
White Bullet: Intelligent seekers (but only for 6 seconds). Shoot the newest ones first and let the older ones fall off the bottom of the screen. The most effective way of dealing with these bullets is to lure them to the top of the screen and then shoot them from below. Watch my technique in Intense Challenge: [Coming soon].
Bug Bullet: These are the little yellow enemy insects that get fired from other insects. Shoot or dodge them.
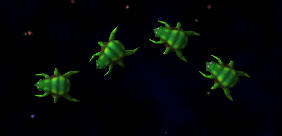
Enemy Killers (1 through 6)
|
|

Getting hit by an enemy insect: Shield -8
These are your basic enemy insects. Shoot them once and they change color and/or size (left to right). It takes six shots to kill the big red killer and only one shot to kill the little green killer.
Enemy Insects
|
|

Getting hit by an enemy insect: Shield -8
Bee: Hits: 4, Bonus: 10
Greenie Meanie: Hits: 8, Bonus: 25
Strong Arm: Hits: 10, Bonus: 25
Tri-Blaster: Hits: 1
Metal Mantis: Hits: 15, Bonus: 30
Narrow Neck: Hits: 10, Bonus: 25
Big Balls: Hits: 20, Bonus: 50
Scorpion: Hits: 8, Bonus: 20
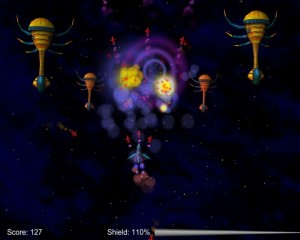
Space Port and Overview
You get several chances to enter each level, so play levels in an order that will help you conserve shield. If you find yourself running low on shield you can exit the level before the squadron enters. You can only enter and exit the bonus round 6 times.
The best strategy is to hit the hardest levels first followed by the easy levels when you are low on fuel.
You must hit the bonus round just before entering Zenix Home World. If you don’t save your last chance at the bonus round for Zenix Home World, you can not win. Zenix Home World is the only level that can’t be completed unless you have power-ups going in.
Squadrons
Always pick on the weakest ones first. Take them out one by one until they are all gone. Except during entry or when you have a yellow powerup, do not try to spray them with bullets equally. This will prolong the process and cause you more harm than good. In high levels it’s good to switch between the two weakest enemies so that yellow bullets can’t get you.
Create Your Own Levels
Creating your own levels is easy! Don’t like that big boss monster in the middle of the first level? Replace him with something different. Want to blow up that annoying co-worker? Put his picture in and blow him sky-high!
Download ZzMain start modifying the actual game. Save this file to your desktop and then double click it.
The Control Panel
After opening the ZzMain file, you will see the control panel. Click the top combo box to select the level you want to modify. Notice that there are 12 levels and 12 practice levels.
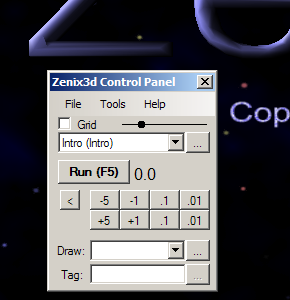

You can always see the control panel by pressing the ESC key.
The “<” button resets the time back to zero. The buttons to the left adjust the level time.
Changing the Bullet Generator
After selecting Level 1, click Tools… then click Bullets. You will then see the bullet generator:

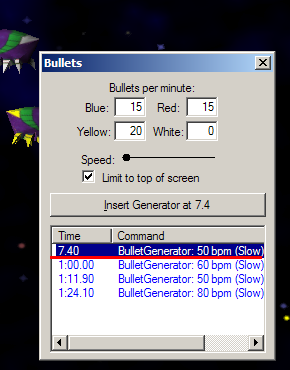
Select the first bullet generator at time 7.40 (see picture to the right). While the bullet generator is selected, you can change the frequency of bullets. To see what it feels like to play with the new bullet generator, you can go to the Control Panel… click Tools… And then Play From Here. When you’re done playing, press the ESC key.
Now click the next bullet generator at time 1:00.00 and modify the bullet frequencies. Repeat this process for all bullet generators on all levels.
Be sure to save your changes periodically.
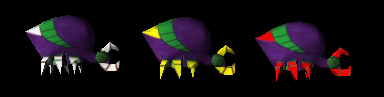
Making Bosses Easier to Kill
From the Control Panel, click the top combo box and select Level 1. Use the buttons to the right of the “<” button to navigate to a time of 25 seconds. (Click the “+5” button 5 times will bring you forward in time by 25 seconds.)
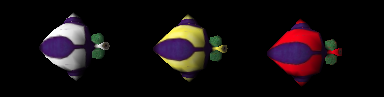
Now right click the big Greenie Meanie boss at the top middle of the screen, and then click Edit Enemy Type:
|
|

As long as the enemy is selected, you can change its properties. Click the box under Hit by player bullet: Hits: “40”. Change the number to 10, and now you have a boss that is very easy to kill.
Making a Playable Game
First, use the Control Panel to save your changes, File… Save (or Save As…). To make a release file, click File… Release… The file that is saved has a .Zenix3D extension and when double clicked will run just like the real game.
The Mouse
The mouse allows you to select and move objects, edit object properties, and scroll back and forth in time.
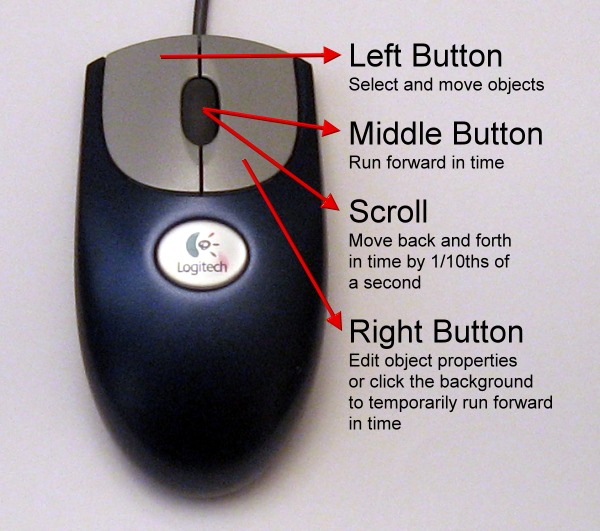
Multiple objects can be selected (or deselected) by holding down the CTRL key while left clicking an object. Once objects have been selected, you can make copies of them by placing them on the clipboard.
The Control Panel
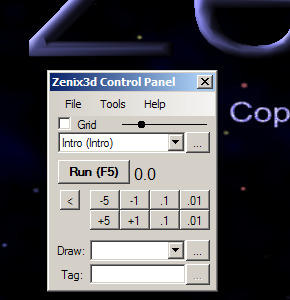
The control panel allows you to change levels, draw enemies, change script time, and access all features of the Zenix3D game editor. You can always see the control panel by pressing the ESC key.
The Grid check box displays the grid so objects can be lined up on the screen. The slider to the right changes the screen size.
The combo box “Intro (Intro)” allows you to change the level. Click “…” to add new levels.
The Run (F5) button allows you to start and stop the simulation.
The “<“ button sets the time to zero, the -5, -1, .1, and .01 buttons change the script time backwards, and the +5, +1, .1, and .01 buttons change the script time forward.
The Draw: combo box allows you draw objects on the screen.
Quick Start Tutorial
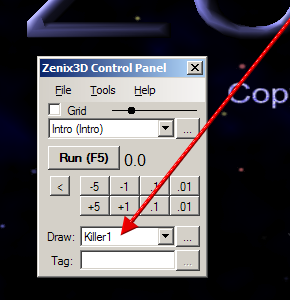 After starting Zenix3D, from the main menu, click the Create Game button. From the control panel, select killer1 from the Draw combo box.
Now left click on the background and move the mouse to draw an enemy. Repeat this process, and you’ll see all the enemy objects are recorded.
To draw an object in the same place as another object, press the SHIFT key before pressing the left mouse button.
Scroll forward and backward in time by scrolling the middle mouse button.
Right click the background stars to watch the simulation. When you release the right mouse button, the script time is reset back to where it was before clicking. This allows for easy viewing of changes.
NOTE: While script time can be adjusted via the control panel, you’ll find that the scrolling the middle mouse button is much more effective for small time changes.
Cut/Copy/Paste
Left click objects to select them. Press CTRL while clicking to select/deselect new objects. Selected objects may be copied to the clipboard by pressing CTRL-INSERT or CTRL-C, or cut by pressing SHIFT-DELETE or CTRL-X.
To copy objects from the clipboard press SHIFT-INSERT or CTRL-V. Copying from the clipboard multiple times (without an intervening time change) causes the objects to be shifted so they don’t completely overlap.
When objects are pasted from they clipboard, they come back at the current scrip time. This allows objects to be moved in time by copying, changing the script time, and then pasting. For example, if an object needs to be moved forward in time (say it was drawn too early), cut it to the clipboard, scroll forward in time, and then paste.
Enemy Group Tutorial
After starting Zenix3D, from the main menu, click the Create Game button. From the control panel, select killer1 from the Draw combo box.
Draw an enemy starting on the left side of the screen and slowly moves across to the right side of the screen. Right click the background to check that the object moves at the proper speed, which should be about as fast as you expect an enemy to cross from one side of the screen to the other. If the speed is wrong, select the object, delete it, and draw a new one.
 Select the object and place it on the clipboard by pressing CTRL-INSERT or CTRL-C. Now copy the object from the clipboard three times by pressing SHIFT-INSERT or CTRL-V three times.
Right click the background to watch the group.
Move each object to a new position so they form a nice looking enemy group.
Enemy Group Time Tutorial
After starting Zenix3D, from the main menu, click the Create Game button. From the control panel, select killer1 from the Draw combo box.
Draw an enemy starting on the left side of the screen and slowly moves across to the right side of the screen. Right click the background to check that the object moves at the proper speed, which should be about as fast as you expect an enemy to cross from one side of the screen to the other. If the speed is wrong, select the object, delete it, and draw a new one.
Select the object and place it on the clipboard by pressing CTRL-INSERT or CTRL-C.
Scroll forward in time (use the mouse scroll button) by several 1/10ths of a second (usually 3 to 5 depending on how fast the objects move across the screen). Copy the object from the clipboard by pressing SHIFT-INSERT or CTRL-V. Repeat this step two more times (scroll, paste, scroll paste, scroll paste)
Right click the background to watch the group.
You can select all objects in the group (select the first one, then select each additional object by holding the CTRL key and clicking the object). Place the whole group on the clipboard, and then paste the whole group back. Move the group to a new location.
Right click the background to watch the two groups.
Zenix3D Music
Matthew Myers composed all of the music in Zenix3D. You may use these songs for non-commercial purposes only. If you use these songs (in whole or in part) you must link to this page of this web site.
| Intro | |
| Space Port | |
| Ending Credits | |
| Ending Credits 2 | |
| Level 1: Blast off | |
| Level 2: Shadow Star | |
| Level 3: Alliance | |
| Level 4: Blasting Further | |
| Level 5: Ruination | |
| Level 6: Insect Invasion | |
| Level 7: Earth March | |
| Level 8: Metal Mantis | |
| Level 9: Galactic Graveyard | |
| Level 10: Bug Zapper | |
| Level 11: Intense Challenge | |
| Level 12: Zenix Home World | |
| Boss Fight |
Zenix3D Art
Randy O’Connor did all the art work for Zenix3D.
You may use models for non-commercial purposes only. If you use any of these models (in whole or in part) you must link to this page of this web site.
Download: Zenix3dArt.zip (contains the meshes and textures)